Cherries have exploded in our house!!! There is cherry guts, cherry nuts, cherry blood lol... A local farmer provided us here in town with delicious Bing and Rainier cherries (Thank you guys). I bought 25lbs,yep that's right 25.What can you do with 25lbs of cherries?!!!
Here is what I made:
Cherry pie filling
Cherry Jam
Dehydrated cherries
Maraschino cherries
Candied cherries
and the feature for tonight..........
Cherry Butter
INGREDIENTS:
4 Cups pitted and pureed cherries
3 1/2 cups granulated sugar
3 T. butter
1/2 t. cinnamon
1/4 t ground allspice
1/2 t. almond extract
1/2 cup lemon juice
1 packet of Sure-jell pectin OR 10T. classic pectin
1) Wash and pit cherry
2) Combine cherries and sugar over med heat. Stir constantly until a roaring bubble, you don't want to burn the bottom.
3) Reduce to low heat. Stir in butter, spices and extract.
4) Add lemon juice and pectin, stir until well combined, about 5 minutes.
5) follow you basic water canning instructions
I'm sure you can do with out the pectin but I like the jell consistency. The next batch of butter I might also try adding a little more butter to the mixture as well.
This is one of the most amazingly tasty butters there is....seriously. Like I'm gonna have some for breakfast tomorrow morning. After you try this, let me know how it turned out for you.
Photo source:
applesandbutter
savvy eats
Thursday, June 30, 2011
Monday, June 20, 2011
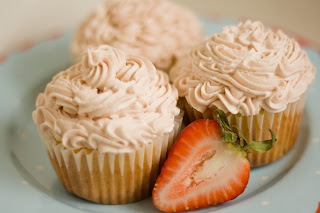
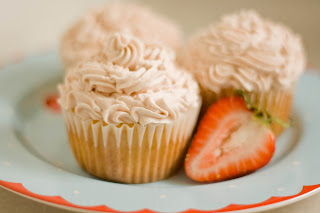
Strawberry cupcakes with Meringue butter cream
I went on a strawberry kick and bought 8lbs of these berries!! So after eating about 2lbs myself I decided I would make some yummy treats for family and friends. Now keep in mind this is a meringue butter cream so its a lot different than basic butter cream (I actually like this kind much better)
Strawberry Cupcakes:
Ingredients
- 2 3/4 cups all-purpose flour
- 1/2 cup cake flour, (not self-rising)
- 1 tablespoon baking powder
- 1 teaspoon salt
- 8 ounces (2 sticks) unsalted butter, softened
- 2 1/4 cups sugar
- 3 large eggs
- 1 large egg white
- 1 cup whole milk
- 1 1/2 teaspoons pure vanilla extract
- 2 cups finely chopped strawberries, plus small strawberries for garnish
Meringue Butter Cream Icing:
Ingredients
- 4 large egg whites
- 1 1/4 cups sugar
- 1 1/2 cups (3 sticks) unsalted butter, room temperature, cut into tablespoons
- 1 teaspoon pure vanilla extract
- 1 1/2 cups (12 ounces) strawberry jam, pureed in a food processor
Directions
- In the heatproof bowl of an electric mixer set over a saucepan of simmering water, combine egg whites and sugar. Cook, whisking constantly, until sugar has dissolved and mixture is warm to the touch (about 160 degrees).
- Attach the bowl to the mixer fitted with the whisk attachment. Beat the egg-white mixture on high speed until it holds stiff (but not dry) peaks. Continue beating until the mixture is fluffy and cooled, about 10 minutes.
- Switch to the paddle attachment. With mixer on medium-low speed, add butter several tablespoons at a time, beating well after each addition. (If frosting appears to separate after all the butter has been added, beat on medium-high speed until smooth again, 3 to 5 minutes more.) Beat in vanilla. Beat on lowest speed to eliminate any air bubbles, about 2 minutes. Stir in strawberry jam with a rubber spatula until frosting is smooth.
The source: Martha Stewart :)
Saturday, June 11, 2011
DIY Saturday- Picture Notepad
At the first part of the year I participated something called "Pay It Forward 2011". Those that responded to it was to home make something and send it to 5 people. Each of those 5 people are to make something and send it to another 5 and so on. I'll admit I JUST now started making my pay it forwards for this year ( but hey I do have all 2011 to make stuff ).
With my oldest Graduating Pre-K I wanted to make something for his teacher and also figured I would knock out a Pay It Forward at the same time.
WHAT YOU NEED:
STEP ONE: TRIM PAPER TO SIZE
Cut each paper into a 4x6 (same size as your photo's). I used a paper cutter which is much faster and easier but you may also use a ruler and x-acto knife.
You want your stack to be about 1/4 inch.
STEP TWO: GLUE PAPER
Tap the stack of paper until one side (short end) is perfectly flush.
Clamp with clothespin or binder clip to keep the paper nicely lined up.
Apply glue evenly to short end and smear with finger.
STEP THREE: GLUE AGAIN AND ......AGAIN.
Let the glue dry for about 10-15 minutes. Then re- apply glue and let completely dry. The layer of glue should be nice and thick (re-apply one more coat if needed and completely dry).
Ruffle the pages to make sure all is secure. If they do come loose apply more glue and let dry.
Place the print face out on top n bottom and re-clamp with clothespins or binder clip.
STEP FOUR: MAKE THE PAPER STRIP
For the spine of the notepad cut a 4" and about 3/4-1" wide piece of sturdy paper.
Apply a thin layer of glue, smear with your finger.
Glue the strip onto the spine of the notepad.
Smooth the strip onto the photo with your finger, then bend the other side down onto the back cover and smooth that down.
*If excess glue gets onto the face of the photos, wipe it away with a damp paper towel.
STEP FIVE: LET EM DRY
Stack the books onto and let em dry :)
I was amazed at how easy it was to make these. This is defiantly going to be a gift item in the future.
With my oldest Graduating Pre-K I wanted to make something for his teacher and also figured I would knock out a Pay It Forward at the same time.
WHAT YOU NEED:
- 2 Vertical 4x6 picture's
- Asst Paper
- Paper cutter or x-acto cutter
- Clothespins or 2 binder clips
- Elmer's white glue
- Heavy books
STEP ONE: TRIM PAPER TO SIZE
Cut each paper into a 4x6 (same size as your photo's). I used a paper cutter which is much faster and easier but you may also use a ruler and x-acto knife.
You want your stack to be about 1/4 inch.
STEP TWO: GLUE PAPER
Tap the stack of paper until one side (short end) is perfectly flush.
Clamp with clothespin or binder clip to keep the paper nicely lined up.
Apply glue evenly to short end and smear with finger.
STEP THREE: GLUE AGAIN AND ......AGAIN.
Let the glue dry for about 10-15 minutes. Then re- apply glue and let completely dry. The layer of glue should be nice and thick (re-apply one more coat if needed and completely dry).
Ruffle the pages to make sure all is secure. If they do come loose apply more glue and let dry.
Place the print face out on top n bottom and re-clamp with clothespins or binder clip.
 |
| Sorry about the lighting change |
For the spine of the notepad cut a 4" and about 3/4-1" wide piece of sturdy paper.
Apply a thin layer of glue, smear with your finger.
Glue the strip onto the spine of the notepad.
Smooth the strip onto the photo with your finger, then bend the other side down onto the back cover and smooth that down.
*If excess glue gets onto the face of the photos, wipe it away with a damp paper towel.
STEP FIVE: LET EM DRY
Stack the books onto and let em dry :)
I was amazed at how easy it was to make these. This is defiantly going to be a gift item in the future.
Subscribe to:
Comments (Atom)


